
En Alegra puedes crear productos inventariables para llevar el control de las cantidades disponibles, o no inventariables, para facturar servicios y otros conceptos.
🎓 En nuestro curso gratuito "Gestión Eficiente de Inventarios" aprenderás a implementar estrategias efectivas para manejar tus productos. Al completar el curso, recibirás un certificado que acreditará tus conocimientos y habilidades en la gestión de inventarios.
👉 Índice
- Qué son los productos inventariables, no inventariables y servicios.
- Crea tus productos y servicios.
- Administra tus productos y servicios.
- Importa tus productos masivamente desde un archivo de Excel.
1. Qué son los productos inventariables, no inventariables y servicios
🔹 Inventariables
Se refiere a productos tangibles que por su naturaleza deben ser almacenados para su posterior venta o uso. Por ejemplo: productos manufacturados, materias primas, productos terminados.
Algunas características de este tipo de productos en Alegra:
- Permite llevar el control de cantidades y costos (Kárdex).
- Puedes establecer cantidades mínimas y máximas de stock.
- Puedes asignarles variantes.
- Presencia en los reportes de "Valor de inventario" y "Rentabilidad por ítem".
- Cuentas contables en las que se registrarán los movimientos: ingresos, inventarios, costos de venta.
🔹 No inventariables
Los productos no inventariables son bienes que una empresa vende, pero que no forman parte de su inventario. Por ejemplo: licencias, seguros, suscripciones en línea.
Algunas características de este tipo de productos en Alegra:
- No manejan costos ni cantidades, por lo tanto, tampoco tendrán presencia en los reportes de "Valor de inventario" y "Rentabilidad por ítem".
- Cuentas contables en las que se registrarán los movimientos: ingresos.
🔹 Servicios
Son intangibles y se consumen al momento de ser prestados. Por ejemplo: consultorías, reparaciones, transporte. Su comportamiento y características son similares a los productos no inventariables.
📌 Notas
- Los combos o kits de productos se crean en el sistema como productos no inventariables, aunque estén conformados por productos inventariables. Al vender un combo, se descuentan las cantidades correspondientes de los productos inventariables que lo conforman.
- Actualmente, no es posible convertir un producto marcado como inventariable en no inventariable y viceversa. La recomendación en estos casos es desactivarlo y crear uno nuevo. Excepción: si creaste un producto no inventariable y aún no lo has vinculado a ningún documento, en ese caso sí podrás convertirlo en inventariable.
2. Crea tus productos y servicios
Sigue estos pasos:
1. Dirígete al menú de “Inventario” y selecciona la opción “Ítems de venta”.
2. Haz clic en “Nuevo ítem de venta”.
3. Completa los campos del formulario con la información solicitada. Observa los campos del formulario y su explicación.
📍 Nota: puedes ingresar los datos principales del producto desde el “Formulario básico” para crearlo rápidamente, o ir al “Formulario avanzado” para añadir información más detallada.
4. Finalmente, haz clic en “Guardar” para conservar los cambios.
Observa:

✍️ Formulario “Nuevo ítem de venta”
Información General
- Tipo: indica si estás creando un “Producto”, “Servicio” o “Combo”.
- Variantes: elige si el producto incluye variantes o no (solo para productos inventariables).
- Nombre: ingresa un nombre que identifique tu producto o servicio.
- Referencia: ingresa un código que identifique a cada producto, puede ser numérico o alfanumérico.
- Unidad de medida: selecciona la unidad en la que se mide tu producto o servicio.
- Categoría: clasifica tus productos de venta por categorías.
- Descripción: agrega información adicional o complementaria de tu producto o servicio.
Precio
- Precio base: ingresa el precio de venta antes del impuesto.
- Impuesto: asigna el impuesto que aplique para tu producto.
🔎 Crea impuestos a la medida de tu negocio. - Precio Total: ingresa el precio de venta al público en general. Este valor se calcula de forma automática teniendo en cuenta el precio base e impuesto.
- Costo inicial: ingresa el costo de adquisición de tu producto (solo para productos inventariables).
Detalle de inventario (solo para productos inventariables):
- Bodega: elige la bodega en la que quedará almacenado el producto.
🔎 Gestiona tu inventario en diferentes Bodegas, Almacenes o Depósitos. - Cantidad inicial: ingresa las unidades iniciales del producto antes de registrar facturas de compra y venta.
- Cantidad mínima: para mantener control sobre tus existencias y evitar quedarte sin stock. Recibirás una notificación cuando llegues a la cantidad mínima al facturar.
- Cantidad máxima: elige la cantidad máxima de tu inventario para evitar acumulaciones de stock.
Sección Lista de Precios: asigna varios precios con valor fijo o un % de descuento sobre el precio base.
🔎 Crea listas de precios en Alegra.
Sección Campos adicionales: puedes agregar los campos adicionales personalizables que necesites según tu inventario y actividades.
🔎 Configura información adicional a tus productos para llevar un mejor control de tu inventario.
Configuración contable
- Cuenta contable: selecciona la cuenta contable en la que se registrará el ingreso que recibas por ventas del producto.
- Cuenta de inventario: selecciona la cuenta contable en la que se registrarán los valores de entradas y salidas del producto (solo para productos inventariables).
- Cuenta de coste de venta: selecciona la cuenta contable en la que se registrará el valor del coste de venta del producto (solo para productos inventariables).
Más opciones
- Adjuntar imagen: agrega una imagen que identifique tu producto o servicio.
🔎 Agrega imágenes a tus productos de venta. - Activar opción de Publicar en Alegra Tienda.
- Activar opción de producto inventariable. Esta condición es irreversible, solo podrás editarla en productos “no inventariables” que no hayas asociado en documentos o transacciones.
- Activar opción de venta en negativo (solo para productos inventariables).
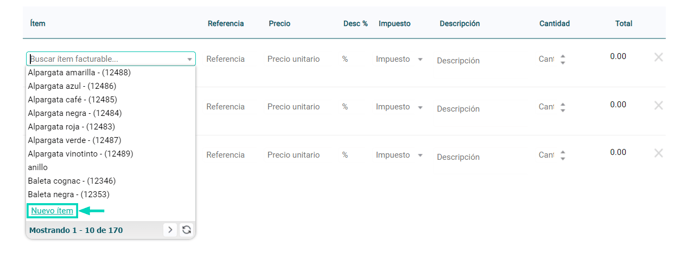
✏️ Crea productos y servicios desde tus documentos
Desde el campo para agregar el ítem, haz clic en “Nuevo ítem”.
Observa:
3. Administra tus productos y servicios
En Alegra dispones de una vista general de todos tus productos, servicios y combos. Podrás visualizarlos de forma organizada por nombre, referencia, precio y descripción. También hay una columna adicional que indica si tu producto o servicio es visible en Alegra Tienda, la solución que te permite vender tus productos en línea.
Observa:
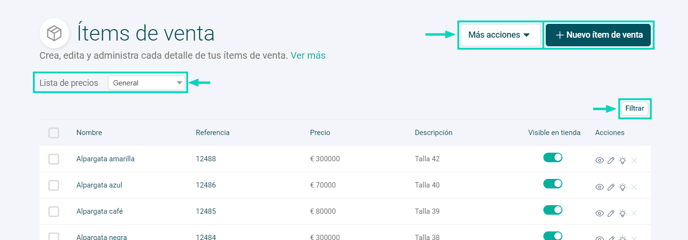
📝 Acciones
- Más acciones: para importar de manera masiva nuevos productos o para exportar tus productos existentes en un archivo de Excel o CSV.
- Nuevo ítem de venta: para crear un nuevo producto o servicio.
- Lista de precios: para filtrar tus productos y servicios según los precios establecidos.
- Filtrar: para realizar una búsqueda específica de tus productos y servicios.
✏️ Cómo alimentar las cantidades de tus productos inventariables
Después de crear tus productos inventariables, es importante mantener actualizadas las cantidades en tu inventario. Al incluir un producto en una “Factura de compra”, se aumentará la cantidad disponible y el valor de la compra se considerará en el cálculo del costo promedio.
4. Importa tus productos masivamente desde un archivo de Excel
Esta opción te permite crear rápidamente una gran cantidad de productos sin tener que ingresarlos manualmente uno a uno, tus productos se añadirán automáticamente a tu inventario, ahorrándote tiempo y esfuerzo.
Esto te ahorrará tiempo y esfuerzo.
Sigue estos pasos:
1. Dirígete al menú de “Inventario” y selecciona la opción “Gestión de ítems”.
2. En el recuadro “Importar nuevos” haz clic en la opción “Importar ítems”.
3. Descarga la plantilla de importación, completa la información de tus productos y guárdala en tu equipo.
4. Haz clic en “Seleccionar archivo”, elige la plantilla que completaste previamente y haz clic en “Importar”.
5. Selecciona la condición de tus productos: “Inventariables” o “No inventariables”.
6. Asigna el respectivo nombre de acuerdo con el concepto de cada columna.
7. Finalmente, haz clic en “Importar”.
Observa:

📢 Importante
- Para crear servicios, puedes elegir “No inventariables”, ya que la importación masiva de ítems no está disponible para servicios ni combos.
- Si vas a importar productos “Inventariables” y “No inventariables”, no los incluyas en la misma plantilla, hazlo desde plantillas separadas o independientes.
📝 Contenido relacionado
¡Esperamos haber resuelto tu consulta!
Conoce las soluciones del ecosistema Alegra: Alegra Contabilidad y Alegra POS.
Aprende con nosotros y certifícate de forma gratuita en Alegra Academy.
¡Únete a nuestro foro de Alegra Community! Allí podrás compartir experiencias y aclarar tus dudas sobre facturación electrónica, contabilidad, normatividad y mucho más.
Descubre las funcionalidades más pedidas y entérate de todas nuestras actualizaciones en el blog de novedades.
Si tienes inquietudes sobre este u otros procesos, nuestro equipo de soporte está listo para ayudarte las 24 horas, cualquier día de la semana, y sin costos adicionales.
